Price tracking with Selenium
What is Selenium?
Selenium is an open-source framework that enables you to write tests or scripts to control a web browser. It supports multiple programming languages, including Python. With Selenium, you can simulate user interactions like clicking buttons, entering text, and navigating through pages.
In Python, Selenium offers an powerful API that’s great for automating tasks. In this article, we’ll guide you through the setup process and demonstrate how to use Selenium to track prices automatically!
The jupyter notebook of this article can be found here.
The basics
Selenium is made up of several components, but we’ll focus on the Selenium WebDriver, which enables you to control the browser. To get started with Selenium, you’ll need a WebDriver for the browser you wish to automate. In this guide, we’ll be using the Chrome WebDriver.
Normally, setting up Selenium involves downloading the ChromeDriver manually and configuring it on your system, but by using the webdriver-manager library, this process is automated: it downloads the correct version of ChromeDriver based on the version of Chrome installed on your machine.
Now, let’s see this in action by creating a Chrome WebDriver instance, navigating to Google, print the title page and then closing the driver.
from selenium import webdriver
from webdriver_manager.chrome import ChromeDriverManager
from selenium.webdriver.chrome.service import Service

def create_driver(url: str = None) -> webdriver.Chrome:
    driver = webdriver.Chrome(service=Service(ChromeDriverManager().install()))

    if url:
        driver.get(url)

    return driver

driver = create_driver(url="https://www.google.com")
print(driver.title)

driver.quit()
Finding elements
Before we can perform any action, we need to locate the elements on the page. To do this, simply right-click on the desired element and select “Inspect” to open devtools, where we can find its identifier.
The identifier can be the element’s ID, class, or XPath. Once you have it, you can use methods to retrieve the element.
However, sometimes elements may not be clickable due to various factors, such as the page still loading, which can lead to errors in automation. To adress this issue, we can use the WebDriverWait module, which allows us to pause the execution until a certain condition is met, such as an element becoming clickable.
To wait for an element to be clickable, we can use the following code:
from selenium.webdriver.common.by import By
from selenium.webdriver.support.ui import WebDriverWait
from selenium.webdriver.support import expected_conditions as EC

wait = WebDriverWait(driver, wait_time)
wait.until(EC.element_to_be_clickable((by, element)))
Here, by is the method we’re using to locate the element (like By.ID or By.XPATH), and element is the identifier of the target element. Additionally, the Expected Conditions (EC) module provides useful conditions to help us manage waiting for specific states of web elements.
Moving to and interacting with elements
Once we’ve located an element, we often need to interact with it. One effective way to do this is by moving the mouse to the element’s position on the page. For this, we can use the ActionChains class, which allows us to chain together various actions:
from selenium.webdriver.common.action_chains import ActionChains

actions = ActionChains(driver)
actions.move_to_element(element).perform()
By creating an instance of ActionChains and calling the move_to_element method, we can move the mouse cursor to the specified element. The perform method is then called to execute the action.
Using ActionChains is particularly useful when working with dynamic elements, such as those that reveal additional options or menus upon hover. This ensures that we can interact with elements that may not be visible or clickable until we move the mouse over them.
After moving to the desired element, we can click on it by adding the click() method to the actions chain, before calling perform.
If we want to type something into an input field, we can use the send_keys() method. It’s a good practice to use the clear() method to clear any existing text in the input field before filling it:
input_field.clear()
input_field.send_keys("Your text here")
Action functions
To streamline our automation process, we can create two handy functions: move_click and move_click_fill. These functions will encapsulate the actions of moving to an element and performing clicks or filling input fields, making our code more organized and reusable.
def move_click(driver: webdriver.Chrome, by: By, element: str, wait_time: int = 10) -> None:
        wait = WebDriverWait(driver, wait_time)
        actions = ActionChains(driver)
        el = wait.until(EC.element_to_be_clickable((by, element)))
        actions.move_to_element(el).click().perform()

def move_click_and_fill(driver: webdriver.Chrome, by: By, element: str, value: str, wait_time: int = 10) -> None:
        move_click(driver, by, element, wait_time)
        el = driver.find_element(by, element)
        el.clear()
        el.send_keys(value)
Price tracking
Let’s say you’re interested in buying the book Hands-On Machine Learning with Scikit-Learn, Keras, and TensorFlow: Concepts, Tools, and Techniques to Build Intelligent Systems. You check the price on Amazon, but it’s a bit higher than you’d like.
We’ll first navigate to the Amazon website. Once we’re there, we’ll locate the search bar at the top of the page. Next, we’ll enter the title of the book, Hands-On Machine Learning, into the search bar to find the best prices available.
We need to instruct Selenium on how to perform these actions!
First, we need to create a Selenium WebDriver instance to control the browser. We’ll use our create_driver function to initialize the instance and navigate to the amazon url.
driver = create_driver(url="https://www.amazon.com")With the Amazon homepage loaded, we can now use our move_click_fill and move_click functions to enter the book’s title into the search bar e trigger the search button. After inspecting the page, we retrieved the search bar’s ID, "twotabsearchtextbox", and the search button ID, "nav-search-submit-button".
Here’s the code to handle both actions:
move_click_fill(
    driver=driver
    , by=By.ID
    , element="twotabsearchtextbox"
    , value="Hands-On Machine Learning with Scikit-Learn, Keras, and TensorFlow"
)

move_click(driver=driver, by=By.ID, element="nav-search-submit-button")
Extracting product prices
Now that we’ve successfully navigated to the search results page, we need to extract the prices for the relevant products. Here’s a more detailed breakdown of the process:
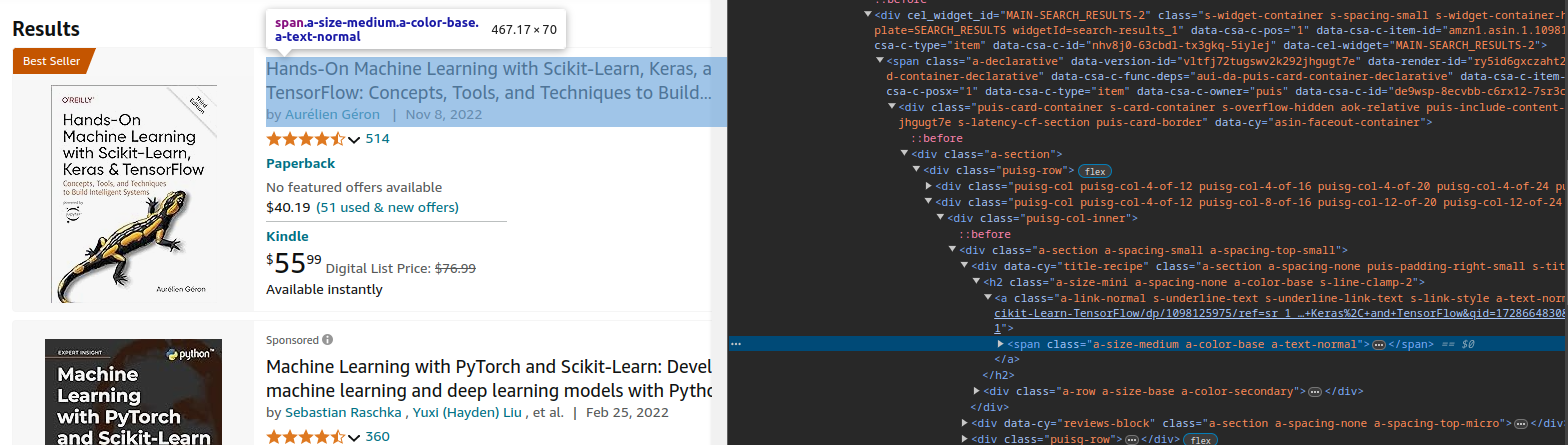
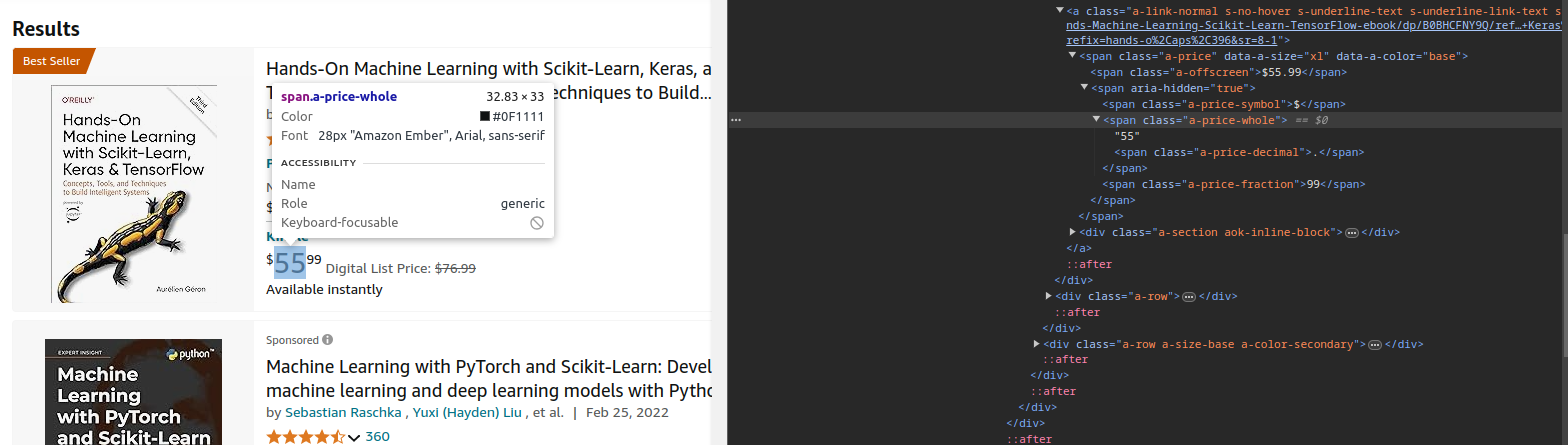
- Inspect the HTML structure: after opening the Developer Tools and navigating to the Elements tab, take a moment to examine the HTML structure. For Amazon, products are typically organized under the class name
"s-result-item". Upon further inspection, you’ll discover that the class name for the product titles is"a-size-medium a-color-base a-text-normal", while the prices consist of two distinct classes:"a-price-whole"for the integer part and"a-price-fraction"for the decimal part, as shown in the images below:
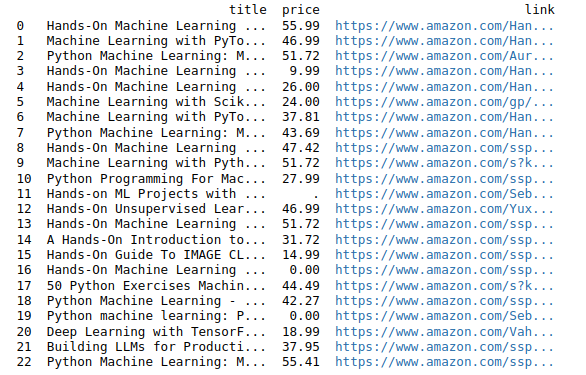
- Extract the title and price: we can loop through each
"s-result-item"and extract the infos we want using thefind_elementmethod. The idea here is to organize the product titles, prices, and links into a pandasDataFrameobject.
import pandas as pd

# locating all titles, prices and product links
titles = driver.find_elements(By.CLASS_NAME, "a-size-medium.a-color-base.a-text-normal")
whole_prices = driver.find_elements(By.CLASS_NAME, "a-price-whole")
fractional_prices = driver.find_elements(By.CLASS_NAME, "a-price-fraction")
links = driver.find_elements(By.CLASS_NAME, "a-link-normal")

# loop to append data to the DataFrame
data = []

for i in range(len(titles)):

    title = titles[i].text
    price = f"{whole_prices[i].text}.{fractional_prices[i].text}"
    link = links[i].get_attribute("href")  # obtaining the product link

    # appending the data to the DataFrame
    data.append({"title": title, "price": price, "link": link})

df = pd.DataFrame(data)

# displaying the DataFrame
print(df)

# closing the driver after collection
driver.quit()
The output would look something like this:
What’s next?
Once you have the data, the possibilities are endless:
- Export to excel: you can save your DataFrame as an Excel file for easy sharing or analysis;
- Email the data: automate sending the data via email using Python’s
smtplibto deliver the Excel file to your inbox; - Schedule price checks: set up regular price checks (daily or weekly) using jobs to track changes over time;
- Deploy to the cloud: run the script on cloud platforms to automate the process remotely;
- Set price alerts: add conditions to notify you if prices drop below a certain point.
Don’t forget that you can see the full notebook here!
Happy automating! 🤖